My leaping arches were a disaster this year. originally constructed by cutting 36″ lengths of white rope light that was bent back on itself, to form a 18 section, about 8 of the 32 sections failed to turn on! So stuff them They were left turned OFF! &*%#$@)*%^Y
Now the season is over, I have had to time to rethink what I would like to do with the leaping arched. I like the efficiency of LEDs, so an Olde School version using 100 LED strings with 3 or 4 colours would be a good option. However, I am yet sorted out a decent supply of LED Strings and a conservative cost would be $10 x 3 x 8 x 4 = $960 for the four arches. That is too “ouch”
So to begin with I will settle with some sections of RGB strips like these. Sample LED Strip. Depending on the strip model, flexible LED strips are available in 12V or 24v versions, with the 24v version being preferred as the current draw is lower.
Either way I am going to need an 8 channel RGB controller small enough to be added to the base of the leaping arches and light enough to be actually mounted on the arch.
 The heart of the new Controller is a small AVR, ATTiny2313. This little AVR is packed with a stack of I/O modules, including a USART capable of receiving DMX. The DMX is received by a RS485 transceiver and connected directly to the USART RX port.
I have been using Ceramic Resonators for a while now on DMX controllers. Whilst their probably are not in specification over all temperature ranges, they have worked well to date. The main advantage of the Ceramic Resonators is cost and the need not to use external capacitors.
This controller will use a 3 wire SPI interface to controller the 24 output channels. The Tiny2313 implements the SPI bus in a non standard manner and will required attention in terms of software. We will return the Output cct shortly.

The power supply requirement +12 to 36 volts and should be as efficient as possible. A member over on DIYC.com, RPM, recommended I check out the LM2574 Smart Switcher form Nat Semi,. RPM uses the same device on his 16channel DC Dimmer. The cct is pretty basic, and National provides tables and graphs to select the switching components. The SMPS will provide power only to the micro-controller and association logic circuits.

The final section of the circuit is the output drive. I had already decided I wanted to use FETs due to their very low On resistance. This in turn means the dimmer power consumption is minimised. To drive the FETs I use serial in, Parallel out Shift Register 74HC595. This was also borrowed from RPM on DIYC.com. There are 3x HC595, configured as a huge 24 bit serial in – parallel out shift register. (Note I have only shown 2 sections to conserve space, full schematics will be available below in the very near future.) The FETs are pretty standard, IRLL014 by International Rectifier. I choose this one for the following reasons:
- HEXFET
- UltraLow R(on)
- Vdss = 55v
- Id = 2A
- Pretty low cost @ AU0.34 each
The artwork is shown below.

After a discussion on DIYC.com, the suggestion was made to add the possibility of using a 78L05 linear Regulator and not fitting the LM2574 Simple Switcher. While the 78L05 addition is not shown above, it was included in the final design that went to the PCB Fab.
I am not too sure if I should say the above artwork is “very pleasing” but I will.

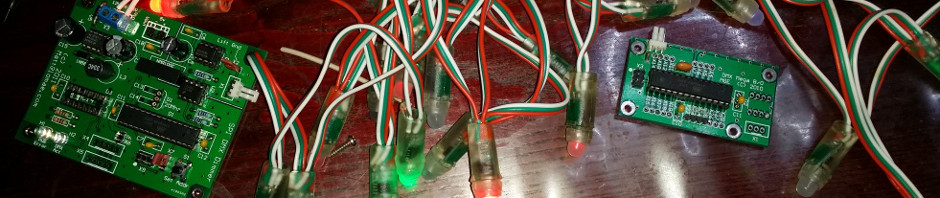
Built unit
April 2011
I finally received the RGB strips from China.
Two test are required:
- Voltage drop of the +12 track with all 8 channels are ON
- Temperature rise of both Tracks and components
After a 36hour Burn in test ( with all channels fully ON) the voltage drop from the input supply connector X13 to Pin 1 of X1 was about 0.2 volts.
Hopefully a mate will drop off his IR thermometer soon.
[nggallery id=9]

8ChRGB Red test (4 channel only)

8ChRGB Purple test (4 channel only)