Window outlines are a popular display items. They accentuate the house beautifully.
There are two things you’ll discover when installing windows lights – String length might be a problem, and tape won’t hold them. Whether you’re putting lights up inside or outside your windows, there are solutions available on the net.
I used Rope light for a number of years, but they tend to droop in the middle and the corners end up rounded.
This year I am adding a more officiated design that uses RGB LEDs.
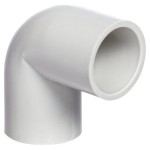
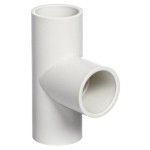
The main concept is to build a free standing frame that sits inside the brick surrounds of the window. I discovered Air-conditioner tight elbow at my local electrician supply shop. These elbows are usually used for removal of the condensate on hot days. They also make straight tees too. And they fits normal light duty conduit.
The RGB LED strip was purchased from AliExpress.
These are the actual ones I purchased. I scored them on sale as great sale.
These Window outlines are designed to be completely dismantled for storage.
Material List
20mm Light Duty Conduit
20mm Tight Elbow
20mm Straight Tees
40mm Clear HeatSrink
Non-waterproof RGB Led Strip
RGB Strip connector tails
Spray tin of PCB Laquer
1m x3mm Bungee cord
3mm Polyester cord
3mm wire
Method I used
Measure the window opening and subtract 10mm.
Take conduit offcut and grease up the outside. Place conduit into the elbow. Measure the distance from one edge of elbow to the other. My elbows measure 45mm. Remove the conduit and measure how far the grease smeared up the conduit, in my case it was 20mm. This means I needto subtract 25 +25+10 mm = 60mm shorter than the window measurements
Cut 20mm conduit to length to suit the window less 60mm.
Carefully unroll the RGB LED strip and trim to maximise the lead. Remember you need to allow 20mm that slides in the elbow.
Solder the RGB 4 core tails to both ends of the strip. Apply the PCB Lacquer onto the LED strip.
Now the Fun Starts. Sliding the clear heat shrink over the conduit and LED strip can be difficult. However after the first attempt, I discovered applying a very very light amount of Olive oil on the back of the conduit made life extremely easy. I dip my finger in extra virginal oil and smear it on the back. I only dip my finger twice over 2 metre of conduit. I just keep running my finger up and down the conduit . The clear heat shrink glides on.
When the sides have been completed, it is time to do a trial run installation. All is good, Yes?
As stated previously, I want to store these completing broken down. This means I need a mechanism to hold them together for the whole season, I decided to use bungee cord inside the conduit.
I use 3mm bungee cord to keep the frame together. Measure the frame perimeter. cut the cord to the perimeter less 1.5meters. Knot a loop on one end. Tie a 1 metre length on bungee cord to the other end. Add a hook to the other end of bungee cord. Using 150mm of 3mm wire form a “U” there will slide into the conduit. Bend 30mm of the wire ends back on itself to prevent the hook sliding completely into the conduit. Hook the cord on the wire hook and feed the bungee cord and rope cord into the conduit and elbow pieces. the last bit is a bit tricky, you need to extend the bungee out of the far end and hook on to the cord.
See below for a photographic record of construction.


