It is up an going

This year is a low key display.

  • I have remove all the pixels.
  • There will be no Beth Star.
  • The Mega tree made it up with only 2 string failures
  • The spinners made it back
  • the Wreath made it out
  • The eves got new Blue and White Icicles
  • The Ikea Stars made out
  •  The RGB Latterns made it back out
  • Kermit is decked out in Blinky Flashy finery
  • The front door received two new “Merry Christmas” rope light dispays
  • And last but not least the Trix panel made it back.

Channel count is way low and all makes it into a single DMX universe.


Posted in AVRs, DMX, LED Flood lites, Light Controllers, Software | Comments Off on It is up an going

8 ch dc dmx

Finally got time on these 8 Channel DC DMX controllers

Capable of 2 Amps per channel, they Rock. The input voltage is rated at 30v but at a pinch they will operate on 36Vdc. if this is a problem, I will simply swap out the 7805 for a modern 3 pin switcher. As can be seen, I no longer seal my boxes. after several seasons of Australian summer, cold wet nights and supper hot dry or humid days, I decided the best way is to let the moisture burn off. the SMD on the back have a light PCB lacquer spray.
I decided not to build in an internal strain relief for the cables. as the controller is always mounted on a conduit or part of the display frame, cable strain relief will be incorporated external to the controller box.
The final picture is for perspective only. It shows RPM’s original 8 Channel DC DMX Controller.


Posted in DMX, Light Controllers | Comments Off on 8 ch dc dmx

Where did it all go?

Despite the best intention and planning,life got in the way of Christmas lights again.
This week has been momentous.  My youngest son married his bride.
One of our home schooled daughter had her year 10 completion interview.
Add to that Saturday softball, there just isn’t much time left. Going to do a low key display display cause I want to.

Posted in ramble | Comments Off on Where did it all go?

RGB Floods Revisited

A good 5 years ago I came up with my RGB PortaFloods.
I have decided it is time to revisit the RGB Flood for Christmas 2013.

Parts in use so far:

  • 10W RGB High Power LED Panel 10 Watt Lamp Light – Sure Electronics P/N DC-LE14221
  • Heatsink – Altronincs 225mm Fan Type Heatsink P/N H0526
  • 3xLM317 Constant Current PWB – Lomae design
  • DMX 3Ch Controller – Lomae design

The Attached Gallery tells the Story.

Posted in DMX, LED Flood lites, Light Controllers | Tagged , , , | Comments Off on RGB Floods Revisited

Hacking a Grinch Dimmer

I needed a Grinch dimmer fast and I wasn’t able to buy a PCB from RPM in a hurry, so I hacked one.

RPM’s Grinch Dimmer

So this is how I made it:

Grinch Dimmer top

next the Bottom – it isn’t as complicated or hard as it may look!

the “Rats nest” on the bottom

I use my on Lay out for the ISP connector. But the standar 2×3 pin header can still be used.

Connections

Connections: DMX on the Left and Grinch on the right

External DMX

External RJ45 for DMX in & Out

Posted in AVRs, DMX, Light Controllers | Comments Off on Hacking a Grinch Dimmer

A New Site, A new project

I have been Toying with a stand alone controller for some time.

Two external factors have occur to push this a step closer.

  1. HLS – Joe Hinkle create the an excellent Free to Use sequencing software – Check it out over at DIYC.com.  Better still down load it and try it out! HLS creates an XML file with tabulated Time step of Channel Data.  Cool thing about thist is for static displays you simply change the time base and you get faster chases etc.
  2. ET TEam released a new AVR controller board based on the XMEGA 128A1. Features include 8 Serial ports 4 SPI ports, on Board Micro SD card, On board 3.3 volt regulator
  3. WIZNET released a WS82oi ( and to make it even easier, Mouser stock them!)


So now to the new Project Details:

  •  4 Universe of DMX data
  • Micro SD card with channel data.
  • Activity LEDs on DMX channels
  • switch selectable display sequences
  • switch selectable sequence speed
  • optional E31.1 I/F


Posted in Uncategorized | Comments Off on A New Site, A new project

DMX Start Address

All my controllers and most other DMX controllers used in the Christmas Lights hobby don’t use switches to set the start address like most commercial applications.  As far as I can see, there are two main reasons for this:

  1. Our controllers are not moved around an lot, where you need to be able to set the address regularly
  2. we want to economise on space.

Removal of the switches does require another mechanism to set the start address.  the least cost option is to use Vixen.  Create a simple 2 second sequence and use the first 2 or 3 channels to transmit a known level as required by the particular controller.  Just remember to set Vixen to absolute levels and the sequence  to repetitive.  I have used the method for a couple of years.

I also have  a neat test set featured in Elektor’s June 2002 Portable DMX Tester.  This unit not only displays the DMX Received but also transmit values input through the GUI.

This year I am added a fair number of controllers as well as changing the display around.  To enable fast Stat address resetting I created my TinyTxDMX testset.  It doesn’t have any bells and whistles, it can’t RX DMX, it can’t tell you anything cause it doesn’t even have a LCD display.  But it is small, small enough to fit in your pocket and reliable.
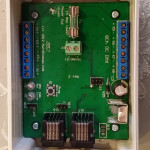
TinyTxDMX Test Set


As can be seen, there isn’t much to this.

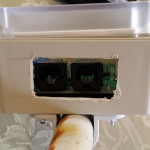
X1 is an RJ45 and outputs DMX data.

S1, S2 & S3 are Binary Coded Decimal switches that are used to set the Start address

S4 is a push button switch to wake it back up.

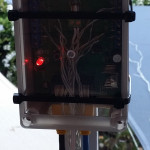
H1 is a LED that flashes every second  to show it it awake.

X3 is used to change the start address scheme.


Update1 – July 2012

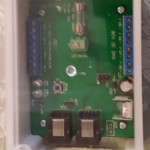
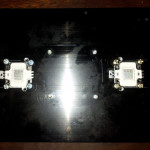
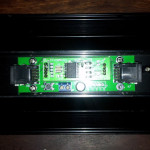
The PCBs came back from the Fab House.

Zero defects found – I still get a warm and fuzzy feeling with I find out I did it all right.

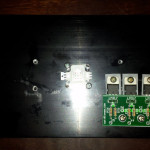
First Prototype soldered

Rev 1 of the firmware is loaded and works a treat.


DMX Tx Firmware

Henne’s Tx code

The transmission code is completely based on Hendrik Holscher ‘s code found in ApNote 113.

http://www.hoelscher-hi.de/hendrik/english/ressources.htm

What is interesting about Henns code is the use of multiple baud rates to build up the DMX protocol.  A breif description follows:

  1. The Break portion – set Baud rate to 90.9K baud
  2. StartByte – set Baud rate to 250K baud
  3. Delay by IBG uS
  4. start transmitting the data at Baud rate of 250K baud

Start Address Schemes

Two start address schemes are implements.

Add Ch1 and Ch2

For start address 1 to 255

  • Ch1  = start address
  • Ch2 = 0

For start address 256

  • Ch1  = 0
  • Ch2 = 255

For start address 257 to 512

  • Ch1  = start address – 256
  • Ch2 = 255
send decimal values over 3 channels
  • Ch1  = Units
  • Ch2 = Tens
  • Ch3 = Hundreds

Project Files:

Tiny Tx DMX Schematic

TinyTx DMX C code

Tiny Tx DMX Gerber Files

Posted in AVRs, DMX, Light Controllers, TOT - tools of the trade | Comments Off on DMX Start Address

P9813 demo

Finally got a chance to code a ATMega 88 to try out the P9813.

P9813

Posted in AVRs | Comments Off on P9813 demo

HOW TO: 3D 4ch RGB Stars

MikeH65 over at  DIYC.com posted a design for a 3d star.
Check the thread here: New Star for my 2012 display

MikeH65's Star model

MikeH65’s Star model

1 Design

I had always intended to add more stars and Mike’s was the trigger to get on with it.  My star is very similar except my is based on 100mm sections of RGB strips.
The 3D aspect of the star come from the fact the small stars sit proud of the larger stars. Mikes’ graphic display this well.

 2 Dimensions

the pointer lengths are: 100, 200, 300 & 400 mm.
Material used, 10×3 mm Rydal bar.
I cut the steel at an angle of 108 degree using 300mm bolt cutters.

Rydal Cutting deminsions

Makes for a simple quick cut and unfortunately with some share edges.  The finished star needs a quick touch up with the angle grinder after they are welded.

My cutting list for a single display item is are follows:

Star Size

(mm)

Cut length

(mm)

Qty Total length required(mm) Rydal lengths
100 130 10 1300 0.3
200 230 10 2300 0.6
300 330 10 3300 0.8
400 430 10 4300 1.1

3 length of 10×3 x 4000 rydal is required per star.  At just under a kilogram per length, I hope to get the complete metal work to be less than 3.5kg.

 3 Steel Construction

I created a simple jig to speed up the welding of the pointers together.  See the gallery below.  I ended up joining the stars with 3.2 mm Φ wire.

 4 LED Strip

For this display Item I am using LED 5050 RGB Strip.  the strip can be cut into segments of 100mm.  Each Star will require a total of 10 metre.  It all starts to add up!!!

To be continued . . . . . . …

Posted in Display Items, DMX | Tagged , , | Comments Off on HOW TO: 3D 4ch RGB Stars

E31.1 DMX over Ethernet

Moving from multiple USB-2-DMX dongles to a system based on E31.1 components requires a bit of planning.
I sorting the Ethernet side of this project pretty easily, by adding a basic Ethernet Switch.

Decided it will be best to utilise a 1RU rack case.


[nggallery id=11]

Posted in AVRs | Comments Off on E31.1 DMX over Ethernet